Sending inputs and assets
You can send two requests to an application depending on whether you want to change or read the state.
-
Advance: In this request, any input data changes the state of the application.
-
Inspect: This involves making an external HTTP API call to the Cartesi Node to read the application state without changing it.
Advance and Inspect Requests
Here is a simple boilerplate application that shows the default implementation of the handle_advance and handle_inspect functions:
- JavaScript
- Python
- Rust
- Go
- C++
const rollup_server = process.env.ROLLUP_HTTP_SERVER_URL;
console.log("HTTP rollup_server url is " + rollup_server);

async function handle_advance(data) {
  console.log("Received advance request data " + JSON.stringify(data));
  return "accept";
}

async function handle_inspect(data) {
  console.log("Received inspect request data " + JSON.stringify(data));
  return "accept";
}

var handlers = {
  advance_state: handle_advance,
  inspect_state: handle_inspect,
};

var finish = { status: "accept" };

(async () => {
  while (true) {
    const finish_req = await fetch(rollup_server + "/finish", {
      method: "POST",
      headers: {
        "Content-Type": "application/json",
      },
      body: JSON.stringify({ status: "accept" }),
    });

    console.log("Received finish status " + finish_req.status);

    if (finish_req.status == 202) {
      console.log("No pending rollup request, trying again");
    } else {
      const rollup_req = await finish_req.json();
      var handler = handlers[rollup_req["request_type"]];
      finish["status"] = await handler(rollup_req["data"]);
    }
  }
})();
from os import environ
import logging
import requests

logging.basicConfig(level="INFO")
logger = logging.getLogger(__name__)

rollup_server = environ["ROLLUP_HTTP_SERVER_URL"]
logger.info(f"HTTP rollup_server url is {rollup_server}")

def handle_advance(data):
   logger.info(f"Received advance request data {data}")
   return "accept"

def handle_inspect(data):
   logger.info(f"Received inspect request data {data}")
   return "accept"


handlers = {
   "advance_state": handle_advance,
   "inspect_state": handle_inspect,
}

finish = {"status": "accept"}

while True:
   logger.info("Sending finish")
   response = requests.post(rollup_server + "/finish", json=finish)
   logger.info(f"Received finish status {response.status_code}")
   if response.status_code == 202:
       logger.info("No pending rollup request, trying again")
   else:
       rollup_request = response.json()
       data = rollup_request["data"]
       handler = handlers[rollup_request["request_type"]]
       finish["status"] = handler(rollup_request["data"])
use json::{object, JsonValue};
use std::env;

pub async fn handle_advance(
    _client: &hyper::Client<hyper::client::HttpConnector>,
    _server_addr: &str,
    request: JsonValue,
) -> Result<&'static str, Box<dyn std::error::Error>> {
    println!("Received advance request data {}", &request);
    let _payload = request["data"]["payload"]
        .as_str()
        .ok_or("Missing payload")?;
    // TODO: add application logic here
    Ok("accept")
}

pub async fn handle_inspect(
    _client: &hyper::Client<hyper::client::HttpConnector>,
    _server_addr: &str,
    request: JsonValue,
) -> Result<&'static str, Box<dyn std::error::Error>> {
    println!("Received inspect request data {}", &request);
    let _payload = request["data"]["payload"]
        .as_str()
        .ok_or("Missing payload")?;
    // TODO: add application logic here
    Ok("accept")
}

#[tokio::main]
async fn main() -> Result<(), Box<dyn std::error::Error>> {
    let client = hyper::Client::new();
    let server_addr = env::var("ROLLUP_HTTP_SERVER_URL")?;

    let mut status = "accept";
    loop {
        println!("Sending finish");
        let response = object! {"status" => status};
        let request = hyper::Request::builder()
            .method(hyper::Method::POST)
            .header(hyper::header::CONTENT_TYPE, "application/json")
            .uri(format!("{}/finish", &server_addr))
            .body(hyper::Body::from(response.dump()))?;
        let response = client.request(request).await?;
        println!("Received finish status {}", response.status());

        if response.status() == hyper::StatusCode::ACCEPTED {
            println!("No pending rollup request, trying again");
        } else {
            let body = hyper::body::to_bytes(response).await?;
            let utf = std::str::from_utf8(&body)?;
            let req = json::parse(utf)?;

            let request_type = req["request_type"]
                .as_str()
                .ok_or("request_type is not a string")?;
            status = match request_type {
                "advance_state" => handle_advance(&client, &server_addr[..], req).await?,
                "inspect_state" => handle_inspect(&client, &server_addr[..], req).await?,
                &_ => {
                    eprintln!("Unknown request type");
                    "reject"
                }
            };
        }
    }
}
package main

import (
	"dapp/rollups"
	"encoding/json"
	"fmt"
	"io"
	"log"
	"os"
	"strconv"
)

var (
	infolog = log.New(os.Stderr, "[ info ]  ", log.Lshortfile)
	errlog  = log.New(os.Stderr, "[ error ] ", log.Lshortfile)
)

func HandleAdvance(data *rollups.AdvanceResponse) error {
	dataMarshal, err := json.Marshal(data)
	if err != nil {
		return fmt.Errorf("HandleAdvance: failed marshaling json: %w", err)
	}
	infolog.Println("Received advance request data", string(dataMarshal))
	return nil
}

func HandleInspect(data *rollups.InspectResponse) error {
	dataMarshal, err := json.Marshal(data)
	if err != nil {
		return fmt.Errorf("HandleInspect: failed marshaling json: %w", err)
	}
	infolog.Println("Received inspect request data", string(dataMarshal))
	return nil
}

func Handler(response *rollups.FinishResponse) error {
	var err error

	switch response.Type {
	case "advance_state":
		data := new(rollups.AdvanceResponse)
		if err = json.Unmarshal(response.Data, data); err != nil {
			return fmt.Errorf("Handler: Error unmarshaling advance: %w", err)
		}
		err = HandleAdvance(data)
	case "inspect_state":
		data := new(rollups.InspectResponse)
		if err = json.Unmarshal(response.Data, data); err != nil {
			return fmt.Errorf("Handler: Error unmarshaling inspect: %w", err)
		}
		err = HandleInspect(data)
	}
	return err
}

func main() {
	finish := rollups.FinishRequest{Status: "accept"}

	for {
		infolog.Println("Sending finish")
		res, err := rollups.SendFinish(&finish)
		if err != nil {
			errlog.Panicln("Error: error making http request: ", err)
		}
		infolog.Println("Received finish status ", strconv.Itoa(res.StatusCode))

		if res.StatusCode == 202 {
			infolog.Println("No pending rollup request, trying again")
		} else {

			resBody, err := io.ReadAll(res.Body)
			if err != nil {
				errlog.Panicln("Error: could not read response body: ", err)
			}

			var response rollups.FinishResponse
			err = json.Unmarshal(resBody, &response)
			if err != nil {
				errlog.Panicln("Error: unmarshaling body:", err)
			}

			finish.Status = "accept"
			err = Handler(&response)
			if err != nil {
				errlog.Println(err)
				finish.Status = "reject"
			}
		}
	}
}
#include <stdio.h>
#include <iostream>

#include "3rdparty/cpp-httplib/httplib.h"
#include "3rdparty/picojson/picojson.h"

std::string handle_advance(httplib::Client &cli, picojson::value data)
{
    std::cout << "Received advance request data " << data << std::endl;
    return "accept";
}

std::string handle_inspect(httplib::Client &cli, picojson::value data)
{
    std::cout << "Received inspect request data " << data << std::endl;
    return "accept";
}

int main(int argc, char **argv)
{
    std::map<std::string, decltype(&handle_advance)> handlers = {
        {std::string("advance_state"), &handle_advance},
        {std::string("inspect_state"), &handle_inspect},
    };
    httplib::Client cli(getenv("ROLLUP_HTTP_SERVER_URL"));
    cli.set_read_timeout(20, 0);
    std::string status("accept");
    std::string rollup_address;
    while (true)
    {
        std::cout << "Sending finish" << std::endl;
        auto finish = std::string("{\"status\":\"") + status + std::string("\"}");
        auto r = cli.Post("/finish", finish, "application/json");
        std::cout << "Received finish status " << r.value().status << std::endl;
        if (r.value().status == 202)
        {
            std::cout << "No pending rollup request, trying again" << std::endl;
        }
        else
        {
            picojson::value rollup_request;
            picojson::parse(rollup_request, r.value().body);
            picojson::value metadata = rollup_request.get("data").get("metadata");
            auto request_type = rollup_request.get("request_type").get<std::string>();
            auto handler = handlers.find(request_type)->second;
            auto data = rollup_request.get("data");
            status = (*handler)(cli, data);
        }
    }
    return 0;
}
As stated in the creating an application section, a typical Cartesi backend application has two primary functions, handle_advance and handle_inspect, these are defined to handle the two different types of requests.
Your application listens to rollup requests, handles them asynchronously using defined handler functions, and communicates the completion status to the rollup server.
Every starter project you create has this base code as a template, ready to receive inputs!
Initiate an advance request
You can initiate an advance request by sending input from the CLI using Cast, Cartesi CLI, or a custom frontend client.
Advance requests involve sending input data to the L1 through a JSON-RPC call, allowing the information to reach the applciation backend and trigger a change in the application's state.
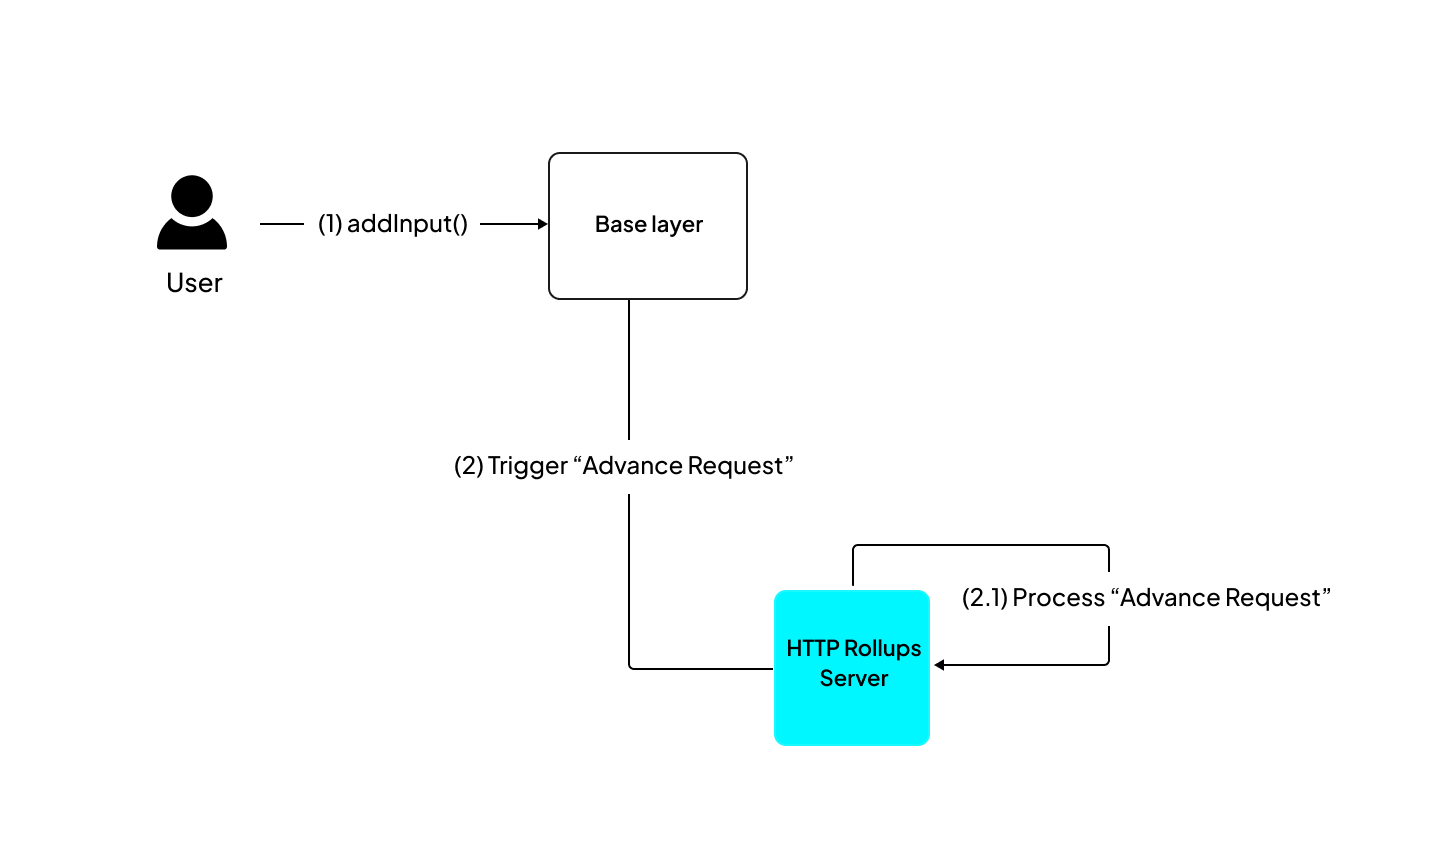
In the application architecture, here is how an advance request plays out.
-
Step 1: Send an input to the
addInput(address, bytes)function of the InputBox smart contract. -
Step 2: The Cartesi Node reads the data and gives it to the Cartesi machine for processing.
-
Step 3: After the computation, the state is updated, and the results are sent back to the rollup server.
You can send inputs to your application with Cast, Cartesi CLI, or a custom web interface.
1. Send inputs with Cast
cast send <InputBoxAddress> "addInput(address,bytes)" <ApplicationAddress> <EncodedPayload> --mnemonic <MNEMONIC>
This command sends the payload to the InputBox smart contract, initiating the advance request.
Replace placeholders like <InputBoxAddress>, <ApplicationAddress>, <EncodedPayload>, and <MNEMONIC> with the actual addresses, payload, and mnemonic for your specific use case.
You can obtain the relevant addresses by running cartesi address-book.
2. Send inputs with Cartesi CLI
Cartesi CLI provides a convenient way of sending inputs to an application. Inputs to be sent to application could in either Hex, String encoding or ABI encoding format.
To send an input, you could use the interactive or the direct option, for the interactive option run:
cartesi send
Response:
$ cartesi send
? Input (Use arrow keys)
❯ String encoding
  Hex string encoding
  ABI encoding
From the response menu you proceed to select the input format then enter the input. While for the more direct option run:
cartesi send --encoding <encoding> <Input>
For the above command, you replace <encoding> with your input format choice (either hex, string or abi), then replace <Input> with your actual input text.
Ensure you're calling the send command from the rood directory of your project else, you would need to provide the project RPC_URL and application address to interact with the application from any random terminal.
3. Send inputs via a custom web app
You can create a custom frontend that interacts with your application.
Follow the React.js tutorial to build a frontend for your application.
Make Inspect calls
Inspect requests are directly made to the rollup server, and the Cartesi Machine is activated without modifying its state.
Inspect requests are best suited for non-production use, such as debugging and testing. They may not function reliably in production environments, potentially leading to errors or disruptions.
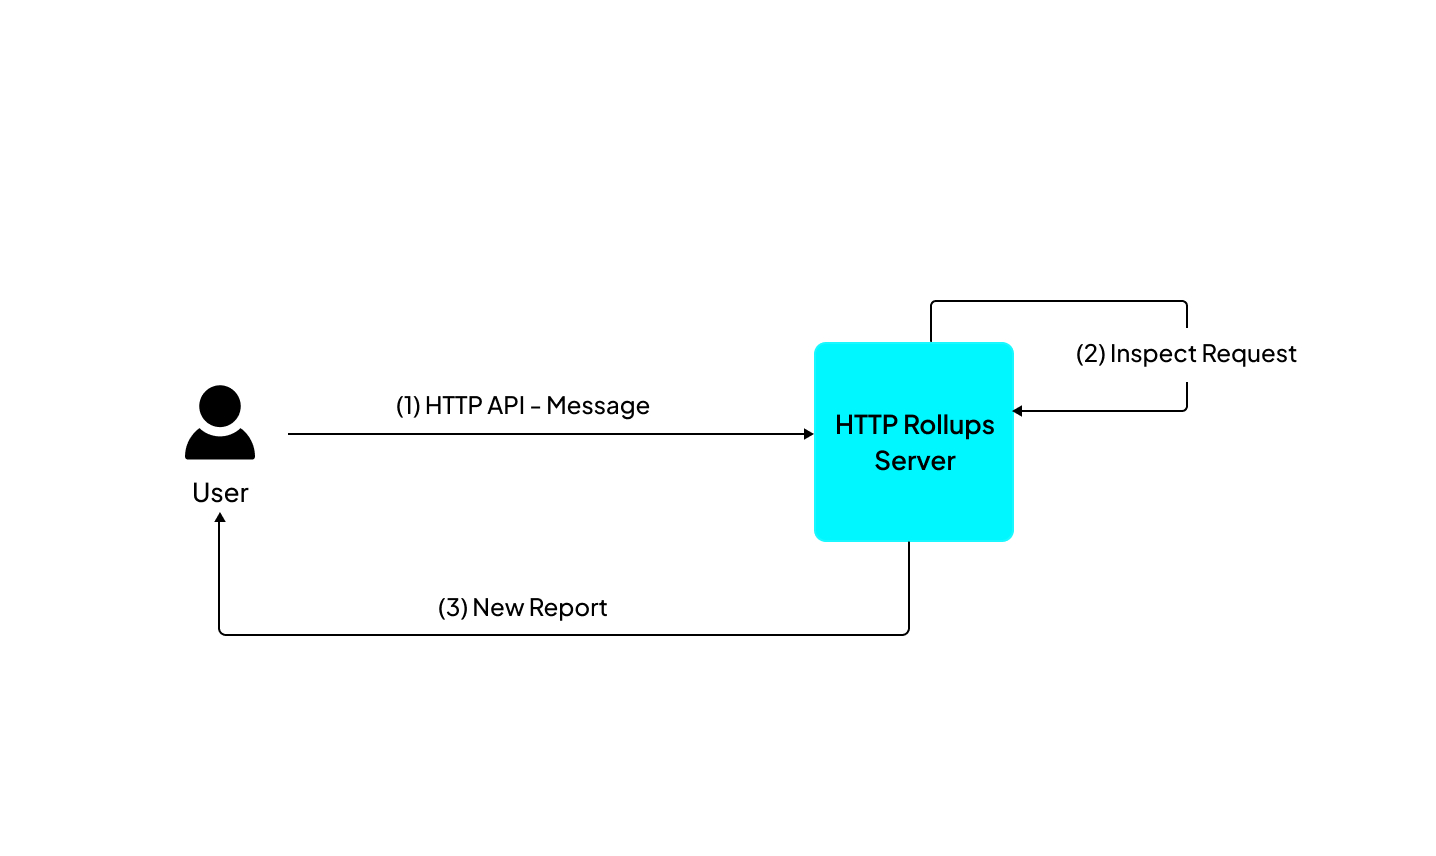
You can make a simple inspect call from your frontend client to retrieve reports.
To perform an Inspect call, use an HTTP POST request to <address of the node>/inspect/<application name or address> with a body containing the request payload. For example:
curl -X POST http://localhost:8080/inspect/0xb483897a2790a5D1a1C5413690bC5933f269b3A9 \
  -H "Content-Type: application/json" \
  -d '"test"'
Once the call's response is received, the payload is extracted from the response data, allowing the backend code to examine it and produce outputs as reports.
From a frontend client, here is an example of extracting the payload from an inspect request:
const response = await fetch("http://localhost:8080/inspect/0xb483897a2790a5D1a1C5413690bC5933f269b3A9", {
  method: "POST",
  headers: {
    "Content-Type": "application/json"
  },
  body: JSON.stringify("test")
});

const result = await response.json();

for (let i in result.reports) {
  let payload = result.reports[i].payload;
  console.log("Report Payload:", payload);
}
Replacing the above address 0xb48..3A9 with the application address from deploying the sample application in the creating an application, then executing the inspect command would emit a report which would immediately be logged to the CLI and can also be quarried using the JSON RPC server.
Depositing Assets
The Cartesi CLI also enables sending/depositing assets to your application. There are currently 3 types of supported assets: Ether, erc20 and erc721.
To deposit assets, run:
cartesi deposit
Response:
? Input (Use arrow keys)
❯ String encoding
  Hex string encoding
  ABI encoding
Convert UTF-8 string to bytes
The cartesi deposit command by default uses the default anvil account, and also the default test erc20 and erc721 contract to interact with your application, but this can all be modified to fit your purpose better.